Let’s face it. Digital marketing moves fast. If you’re running Facebook or Instagram Ads, managing multiple Pages, or working with a team or clients, you can’t afford to waste time jumping between accounts.
That’s where Meta Business Portfolio comes in, which most people still refer to as Facebook Business Manager.
It’s a free tool that helps you manage all your Facebook Pages, Instagram accounts, ad accounts, and even product catalogs in one place. Whether you’re a business owner or a digital marketing agency, this tool gives you full control and visibility over your assets.
If you’ve avoided setting it up because it seems confusing or too technical, you’re not alone. The good news is you don’t need to be an expert to get started. This guide will walk you through everything, step by step.
What is Meta Business Portfolio?
Meta Business Portfolio, also known as Facebook Business Manager, lets you:
-
Manage multiple Facebook and Instagram Pages
-
Control access to ad accounts and assets
-
Assign roles to team members or clients without giving away ownership
-
Organize everything in one place securely and efficiently
If you’re part of a team or you’re an agency working with clients, you can grant specific access levels. For example:
-
Admins can manage everything inside the Business Manager, including ads, Pages, Pixels, and even client accounts.
-
Employees get limited access, so you stay in control of your assets.
Agencies can link a client’s Facebook assets without taking ownership, while businesses can allow their staff to help manage marketing activities without compromising security.
Want to learn how to add team members to your Business Manager? Click here.
Why You Should Set Up a Meta Business Portfolio
If you’re running ads, managing multiple social media assets, or working with clients, you need this tool. Here’s why:
-
You keep full control over who can access what
-
You avoid mixing business and personal assets
-
You reduce the risk of losing Pages or Ad Accounts to ex-employees or freelancers
-
You get access to advanced tools and settings, which is especially important with the iOS privacy updates
Whether you’re a solo business owner or part of a marketing team, Facebook Business Manager gives you structure, control, and security.
Now let’s dive in.
Here’s exactly how to set up your Facebook Business Manager from start to finish.
All you need is your personal Facebook account to confirm your identity and an active business email.
Let’s get started.
Step 1: Create Your Facebook Business Manager Account
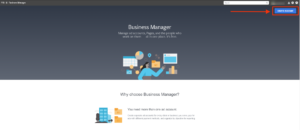
1. Go to business.facebook.com, then click on “Create Account.”
2. Fill out the signup form with your business name, your full name, and your active business email address.
3. Click Submit, then check your email and click “Confirm” to activate your account.
4. Once confirmed, your Business Manager account is live. From here, the next important step is to optimize and verify your business.
To verify your business, you’ll need to upload official documents and prove you’re associated with the business. This process unlocks full access to ad features, improves security, and builds trust with Meta.
Want to learn how to verify your business? Click here
Step 2: Add Your Business Details
Before using your account for advertising, it’s important to complete your business profile:
1. In Business Manager, go to Business Settings > Business Info
2. Add your:
- Legal business name
- Business phone number
- Business address
- Website (Make sure this is a real, working site. You must have one to verify your business.)
Accurate business details are required for verification and help Meta understand the nature of your business.
Step 3: Add or Connect a Facebook Page
Once your Business Manager is ready, the next step is linking your Facebook (and optionally Instagram) Page.
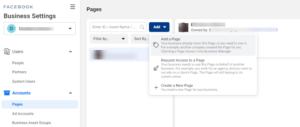
1. On your Business Manager dashboard, click “Pages” in the left-hand menu.
2. Choose one of the following options:
-
- Add a Page – Instantly links your Page if you’re already the admin.
- Create a Page – If you don’t have a Facebook Page for your business yet.
- Request Access to a Page – If you’re an agency managing a client’s Page.
- Add a Page – Instantly links your Page if you’re already the admin.
If you’re adding a Page you already manage, the request is automatically approved. If you’re requesting access to a client’s Page, make sure to contact them so they can approve the request promptly.
To request access:
- Click “Request Access to a Page”
- Enter the Facebook Page name or URL
- If the Page doesn’t appear, click here to troubleshoot
Once your Pages are linked, you’ll be able to track content, manage publishing, and monitor key metrics like reach, engagement, and click-throughs in one all place.
However, if you don’t yet have a Page for your business, you can create one. Click here to learn how to create a Facebook Page.
Step 4: Add or Link Your Ad Account
To run paid campaigns, you’ll need to link or create an ad account.
1. Go to Business Settings > Ad Accounts
2. Select one of the following:
-
- Add an Ad Account – If you already have one
- Create a New Ad Account – If you’re starting fresh
- Request Access to an Ad Account – For agencies working on client accounts
- Add an Ad Account – If you already have one
To find your existing Ad Account ID:
- Open Ads Manager
- Check the Settings section or look at the account URL (act=XXXXXXXXXX)
While setting up your ad account, you’ll be required to select your currency and time zone.
Note: These two settings cannot be changed later, so double-check before saving.
Step 5: Assign People to Roles
If you’re working with a team or agency partners, assign roles to manage access securely and efficiently.
1. In Business Settings, go to People
2. Click “Add” and invite your team members via email
3. Choose their role:
-
- Employee Access
- Admin Access
- Or create Custom Access for more control
- Employee Access
4. Assign them to specific assets like Pages and Ad Accounts, and define their access level
Only grant admin access to people you fully trust, as this role has complete control over your business assets.
Final Thoughts
Setting up and using Meta Business Manager (formerly Facebook Business Manager) might feel a bit overwhelming at first, and that’s completely normal. There’s a lot to take in, and it takes a little time to get familiar with everything.
But once you do, it becomes your go-to hub for managing Pages, ad accounts, and all your business assets in one place.
The real benefit is control.
You can run more advanced ad campaigns, track your results more accurately, and manage access without mixing your personal and business accounts.
If you’re serious about using Facebook and Instagram for marketing, this tool will save you time, simplify your workflow, and give you the insights you need to improve performance.
Too busy to manage it yourself?
You can always hire someone to help, or reach out to us and we’ll take care of it for you.
Have questions about setting up your Business Manager or want to share your experience? Leave a comment below. We’d love to hear from you.
Last Updated on June 10, 2025
Subscribe And Receive Free Digital Marketing Tips To Grow Your Business
Join over 8,000+ people who receive free tips on digital marketing. Unsubscribe anytime.